I am SO close to finishing! I worked for 3 hours today during class to finish musicTouch and it's almost there!
I have the whole board working with test recordings - I just need to implement the actual recordings.
One problem I ran into along the way was with the analog pins. I am using two analog pins (14 and 15) and when I had the Arduino hooked into the computer they worked fine. However, when I plugged in the battery - they would no longer work. I fooled around with it for a while but then I tried decreasing my analog touch cut off sensor and it worked perfectly. So I think there is something with the amount of voltage that the battery gives off decreases the sensitivity of the analog pins. but once I changed the touch cut off to 30 it worked perfectly!!
Also - the recordings are really quiet but when I do my own recordings I'll just record them very loudly. I think this is because the speaker is very small.
Here are some pictures of the set up and it working with test recordings :
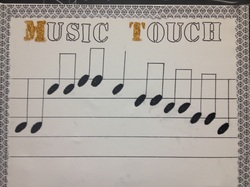
Here is the front of the finished board. As you can see the rhythm for Twinkle is now complete - there are 8th notes and quarter notes.
The notes staffs are outlined in sharpie and the note heads are in Bare Paint Conductive paint. However, it's slightly frustrating because it smudges even when dry and so now there are little paint smudges all over the board...but oh well. It's just a prototype. :)
The notes staffs are outlined in sharpie and the note heads are in Bare Paint Conductive paint. However, it's slightly frustrating because it smudges even when dry and so now there are little paint smudges all over the board...but oh well. It's just a prototype. :)
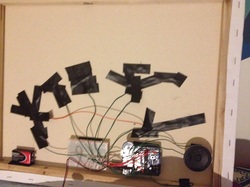
This is the back of my board. It is a little messy because of the amount of electrical tape everywhere....and I would try to change that but I am not quite sure what else I would use since when trying to solder to conductive thread it lights on fire.........
The Arduino, bread board, speaker and battery are all attached using Velcro which I attached to the canvas with Krazy Glue that advised me to keep away from my fingers because it "binds skin instantly"
yikes.
Fear not my friends. I still have all of the skin on my fingers.
The Arduino, bread board, speaker and battery are all attached using Velcro which I attached to the canvas with Krazy Glue that advised me to keep away from my fingers because it "binds skin instantly"
yikes.
Fear not my friends. I still have all of the skin on my fingers.
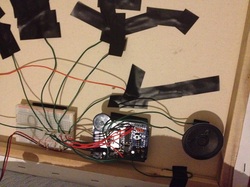
This is a closer up view of the back of my board. I cut and stripped wires to connect from the bread board to the electrical thread which I sewed into each note head. Then covered it all in tape so it wouldn't touch anywhere and blow things up....
 RSS Feed
